


I get questions on occasion about how to edit my editable products. If you're not sure how to do this, read on. This tutorial is for you!
Step One:
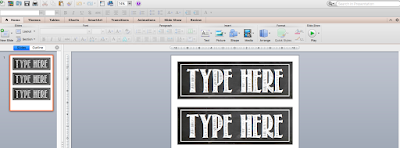
Open the file with Powerpoint. On the left side you'll see a small preview of each page in the file. The file I'm showing you, my chalkboard themed schedule cards, only has one page. On the right, the larger version is the one you'll actually be working with and editing. If the font doesn't look like it's supposed to, you likely do not have the correct font downloaded on your computer. There's typically instructions within the file or the purchase details about what font you need and where you can get it. This file uses the font "Return to Sender".
Step Two:
Click on the piece you're going to edit. Here, I've just written "Type here" so buyers have a text box already made.

Step Three:
Highlight the text you want to edit.

Step Four:
Replace the standard text with whatever you want it to say.

Step Five:
Highlight the text again. Adjust the font size to fit the area using the top toolbar. If you hover your mouse over the outer border of the text box, your cursor will change to what looks like a compass rose. You can now click and move the text box so it fits your area better.

Pin this post.

